Motorcycle safety relies on mirrors for riders to keep tabs on what's going on around them. Yet, not every mirror cuts it the same way. Riders have long been bickering over which is better: bar end mirrors or the stock mirrors. They argue about which (Bar End Mirrors vs Stock Mirrors) gives a better view, […]

How can I Adjust Motorcycle Suspension to My Weight? 5 Easy Steps
When it comes to motorcycle riding, speed and control are important but so are comfort and safety. It is a top priority to adjust motorcycle suspension to suit your weight if you want to achieve the best balance of comfort and safety.
It doesn't matter if you're all about lazy Sundays on the road living for speed on the racetrack, or just scooting around town every day. When you dial in your suspension, you're looking at smoother steering, tires gripping the road like glue, and an overall buttery glide.
This guide is gonna show you all the steps to adjust your motorcycle suspension with your poundage, so you can ride freely.
Table of Contents
Why's it a big deal to tune your suspension to your weight?
Before we leap into the how-to, let's break down why it's wicked important to adjust your motorcycle’s suspension:
- Tweaking Handling: If you dial in the suspension right, your motorcycle works better when you're making turns, stopping, or picking up speed.
- Smooth Rides: When the suspension is on point, it gobbles up the rough stuff on the road making your ride a lot comfier.
- Staying Safe: Get the suspension wrong, and it might mess with your grip, make the motorcycle, and things could get risky.
- Tires Lasting Longer: When you've got the suspension set just so, it means your tires wear down nice and even, which will keep your wallet happier.
Motorcycles come ready for someone who's around 150-180 pounds (68-82 kg). If you're lighter or heavier than that sweet spot, tweaking your motorcycle's suspension is key so it can do its thing the right way.
The Guts of Motorcycle Suspension

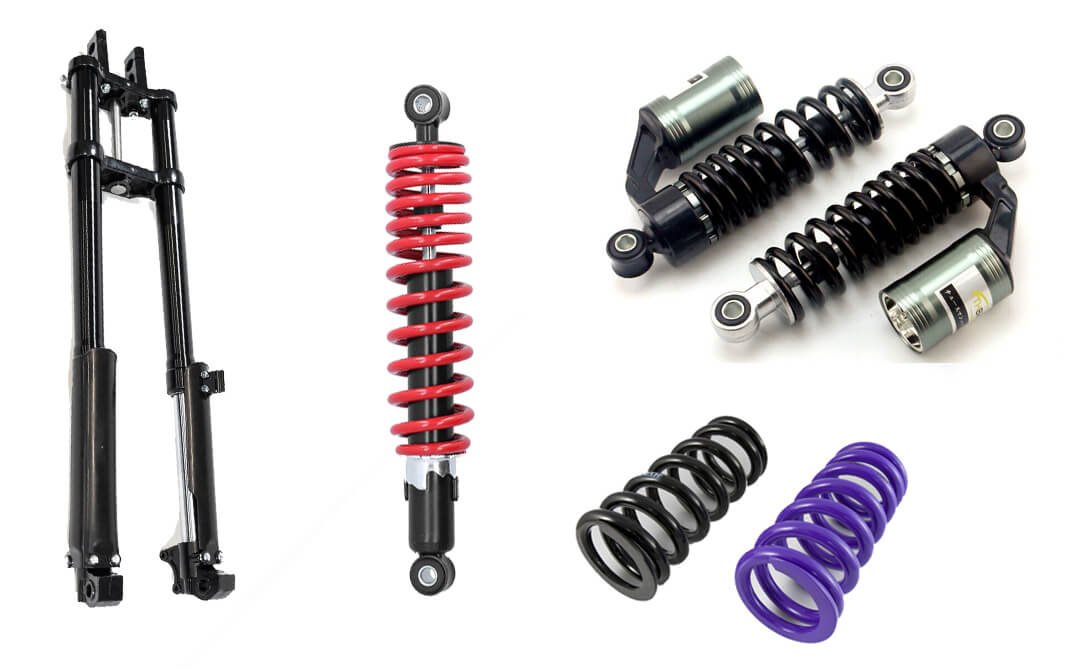
guts of motorcycle suspension
Okay, before you go tweaking stuff, you gotta get the down-low on the main bits of your motorcycle suspension setup:
Forks (Front Suspension):
- The telescopic tubes at the front of the motorcycle.
- Absorb shocks from the front wheel and maintain stability.
Shock Absorber (Rear Suspension):
- Located at the rear, it supports the bike’s weight and absorbs bumps.
- Many modern bikes use a single rear shock, while older models may have dual shocks.
Springs:
- Both the front and rear suspensions use springs to absorb impact.
- Their stiffness (spring rate) determines how much weight they can support.
Damping:
- Controls how quickly the suspension compresses or rebounds after hitting a bump.
- Adjustable on most modern motorcycles.
Preload:
- Adjusts the initial tension on the suspension spring to account for rider weight.
- Critical for setting the proper sag (explained below).
Steps to Adjust Motorcycle Suspension to Your Weight
Follow these detailed steps to fine-tune your suspension for optimal performance.
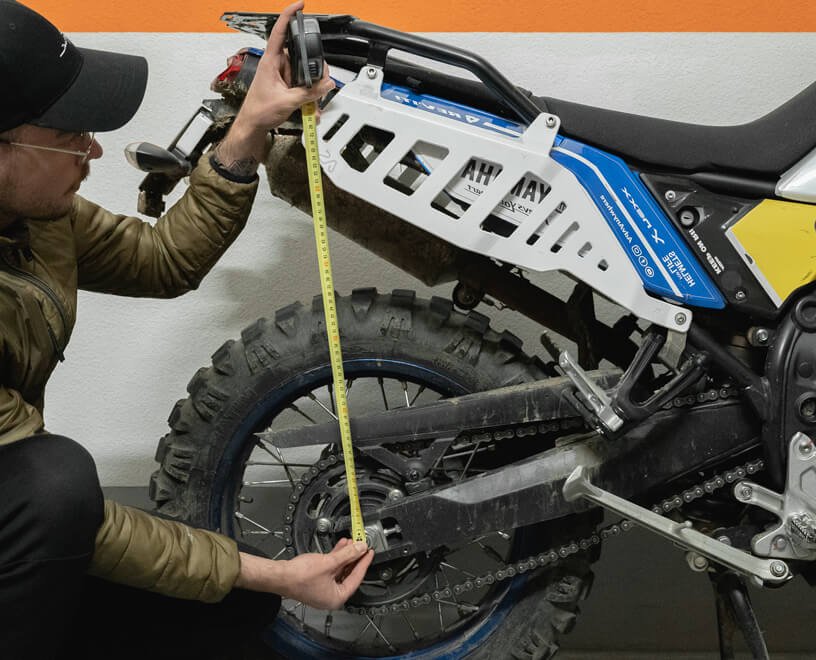
Step 1: Measure Rider Sag

measure rider sag
Rider sag is the most critical step in suspension adjustment. It refers to how much the suspension compresses under your weight when you sit on the motorcycle.
- How to Measure Rider Sag: You should get the Right Tools, such as measuring tape or ruler. A stand to hold the motorcycle upright is necessary. You'd better ask a friend to assist you.
- Take Baseline Measurements: With the motorcycle on a stand, measure the distance from a fixed point on the frame to the axle (front and rear). Write this number down as your "static measurement."
- Sit on the Bike: Wear your full riding gear (helmet, jacket, etc.) to account for your true riding weight. When you sit in a normal riding position, you can ask a friend to hold the motorcycle upright.
- Measure Again: Measure the same distance from the fixed point on the frame to the axle. This is your "loaded measurement."
- Calculate Sag: Subtract the loaded measurement from the static measurement. (Ideal rider sag is typical: Front Suspension: 30-35mm. Rear Suspension: 25-30mm.)
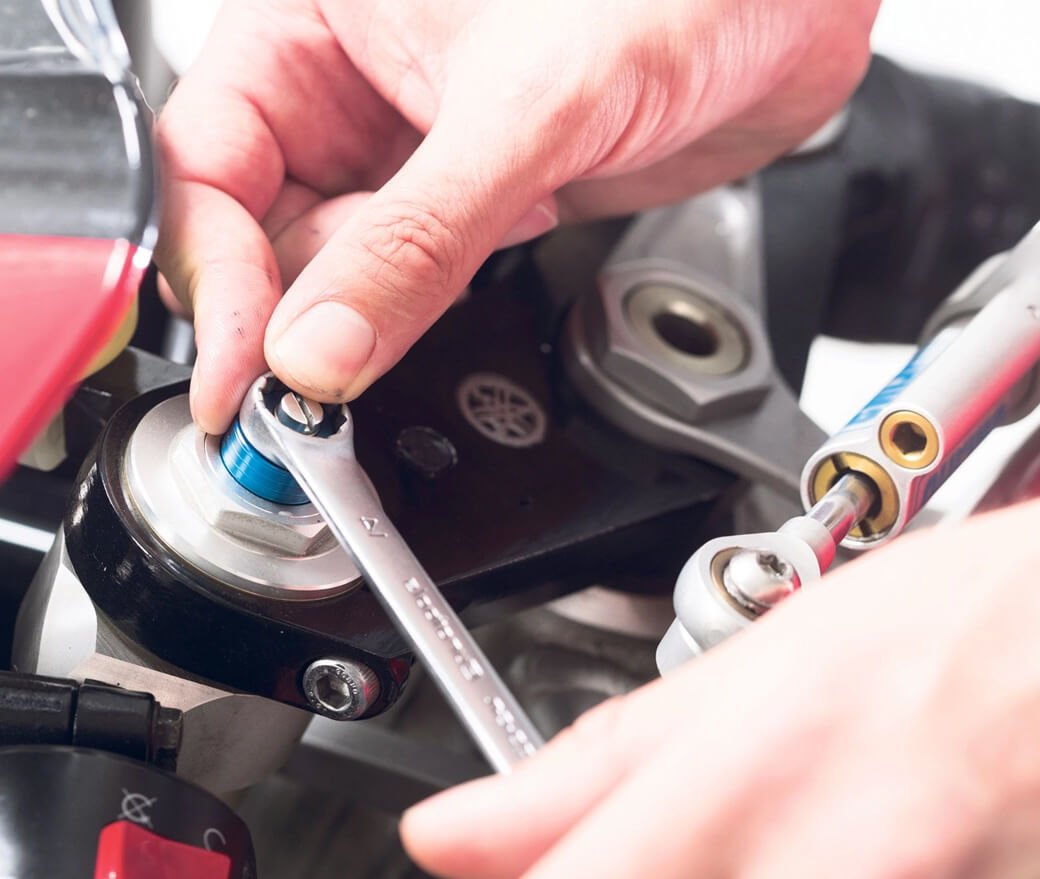
- Adjusting Preload for Sag: If the sag is too much (more than the ideal range), increase the preload. If the sag is too little (less than the ideal range), decrease the preload.
Note: Most bikes have preload adjusters which can be turned with a spanner or wrench. You can know the exact location by reading your owner’s manual.
Step 2: Adjust Compression Damping

adjust compression damping
When you hit a bump, the speed at which your suspension squishes is managed by compression damping. Crank it too low and your bike might just smack the ground. Jack it up too high and you're in for a rough ride feeling every little bump.
How to Adjust Compression Damping:
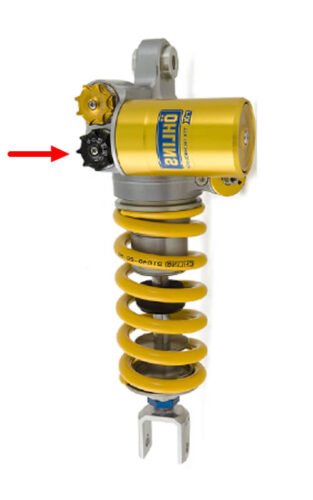
- Locate the Adjuster: Usually found on the top or bottom of the fork for the front suspension. On the rear shock, it’s typically a knob or screw near the spring.
- Adjust Gradually: Turn the adjuster clockwise to increase damping (stiffen) or counterclockwise to decrease it (soften). Make small adjustments (1-2 clicks at a time) and test to ride the motorcycle after each change.
- Test for Balance: Ride over bumps and observe how the suspension reacts. Aim for a setting that absorbs bumps effectively without feeling too soft or too harsh.
Step 3: Adjust Rebound Damping

rebound damping
Rebound damping ensures the suspension returns to how it was before getting squished. If you don't set up rebound right, your bike might bounce around a lot (if it's too zippy) or act lazy (dragging its feet).
How to Adjust Rebound Damping:
- Locate the Adjuster: For the front fork, it’s often at the bottom. On the rear shock, it’s typically near the compression adjuster.
- Fine-tune the Rebound: Turn the adjuster clockwise to slow down the rebound or counterclockwise to speed it up. Make small adjustments and test the motorcycle.
- Test the Feel: Push down on the suspension and let go. It should return to its original position smoothly without bouncing excessively or being sluggish.
Step 4: Check and Adjust Spring Rate (If Necessary)

check the spring rate
If you’ve adjusted the preload and damping but still can’t achieve the correct sag or ride quality, your springs may not be suitable for your weight.
- Determine the Correct Spring Rate: Consult your motorcycle manual or an online calculator to find the ideal spring rate for your weight and riding style. Heavier riders may need stiffer springs, while lighter riders may need softer ones.
- Replace the Springs: Replacing springs requires specialized tools and knowledge. If you’re unsure, take your bike to a professional suspension tuner.
Step 5: Test Ride and Fine-Tune

After you adjust the suspension, a test ride is necessary.
Once you’ve made the initial adjustments, take your bike for a test ride.
Pay attention to the following:
- Handling: Is the bike stable during cornering and braking? Does it feel balanced front-to-rear?
- Comfort: Does the suspension absorb bumps well? Does it feel too firm or too soft?
- Traction: Are the tires maintaining a good grip on the road? Based on your observations, make small adjustments to the preload, compression, and rebound settings until you achieve the desired performance.
Additional Tips for Suspension Adjustment
- Adjust for Riding Conditions: If you’re riding with a passenger or carrying luggage, increase the preload and damping to handle the extra weight. For track days, you may want firmer settings for better performance.
- Keep a Log: Write down your suspension settings and the changes you make. This helps you track what works and what doesn’t.
- Regular Maintenance: Suspension components wear out over time. Check your forks and shocks regularly for leaks or damage, and replace fluid as recommended by the manufacturer.
- Seek Professional Help: If you’re unsure about making adjustments yourself, consult a professional suspension tuner. They can customize your setup to match your weight, riding style, and preferences.
- Don't Overweight: Consider how much can you carry your motorcycle if you pack more gear. Long-term overloading may damage the motorcycle's suspension.
Conclusion
Setting up your motorcycle suspension for your weight has a huge impact on your riding experience. You might think it's tough, but breaking it down into steps—checking sag tweaking preload, and adjusting damping—makes it easier to nail. After you put in the effort to dial in your suspension, you'll notice better handling more comfort, and improved safety on all your rides.
Remember, tuning your suspension doesn't work the same way for all riders. Put some effort into experimenting with various adjustments giving them a whirl, and fine-tuning to discover the perfect fit for your style. After nailing the right suspension setup, connecting with your bike and the road adds a bunch more enjoyment to every trip.

Motorcycle mechanic, writer. Interested in motorcycle gear for years. Like to stay up to date with the newest products and techniques of the motorcycle.
Picking the perfect brake pads for your ride has an influence on how safe you are, how well your whip handles, and what you’ll shell out over time. You’ve got a whole menu, from wallet-easy organic pads to fancy ceramic or semi-metallic types. To get why budget brake pads ain't the same as the pricier […]
E-bikes have transformed into more than just gadgets to help you get around. Now, they're speed demons that can go toe-to-toe with motorbikes. It’s 2025, and these speedy machines have gotten a huge boost from better motors, more powerful batteries, and sleek designs that cut through the air like a knife. Let’s dive into the […]
Many riders who aren't so tall or ladies just starting to ride bikes need to pick out the best Motorcycles for Short Riders and Women. They gotta look for three key things: a seat that's not too high up, a bike that's not too heavy, and something that looks good enough to give them confidence. […]
As we accelerate into 2025, motorbikes are getting a serious tech upgrade. They’re all about safer rides and more fun on the road. Even if you’re a pro or just starting, kitting out your two-wheeler with cool tech stuff is a game-changer. Check out these ten top motorcycle gadgets each motorcyclist will want in 2025. […]
Getting around the city every day can be super annoying. You've got traffic like molasses nowhere to park, fuel prices through the roof, and buses stuffed like sardine cans make heading to the office a real pain. For loads of folks, getting a motorcycle is a pretty slick move—they’re nimble, cost-effective, and perfect for squeezing […]

